Residual liquid in waste ink stack
Fault Phenomenon
The ink stack valve has two possible flow directions. If switching between these directions fails, you may see one or both of the following:
-
Ink cartridge leakage
-
Ink droplets hanging on the print head, causing color mixing and dripping
Cause Analysis
-
The ink stack solenoid valve fails to switch to the wiper path.
-
The liquid at the wiper blade keeps accumulating and eventually overflows onto the machine body or even into the internal structure.
-
This may lead to corrosion and damage.
-
The ink stack solenoid valve fails to switch to the ink pad path.
-
The ink stack completely loses its suction capability.
-
Liquid builds up inside the ink pad, which severely affects the print head condition.
Troubleshooting Steps
-
Before starting, take photos of the current status and the troubleshooting process for reference.
-
Remove/uncover the top cover plate.
-
Run a standard (moderate) cleaning cycle.
-
Wait for about 1 minute 15 seconds.
-
From above, observe that the print head slowly moves out (this movement is automatic; do not move it manually). At this point, observe the residual liquid level in the ink stack.
-
During the 4-second continuous ink suction process:
-
If the liquid level does not drop at all, you can clearly determine that the ink stack solenoid valve has failed to switch to the ink pad path.
-
In this case, the ink stack solenoid valve needs to be replaced.
-
If the liquid level drops normally, you should hear:
-
A clear "click" when the valve switches after four seconds, followed by
-
An obvious pumping sound from inside the ink stack.
If there is no obvious pumping sound, it indicates that the ink stack solenoid valve has failed to switch to the wiper path and needs to be replaced.
Please contact eufyMake Customer Support at support@eufymake.com and include:
a. Purchase Order Information
b. Printer SN, please refer to: https://support.eufymake.com/s/article/How-to-Check-the-Device-Serial-Number-SN
c. For printer and APP logs, please refer to:https://support.eufymake.com/s/article/Log-Feedback-Upload-Process-App-PC-Overview
d. Provide troubleshooting videos. For example: if the liquid level does not drop at all during the four-second continuous ink pumping process, this video/picture can be provided
Seven-Way Valve Switching Abnormal – No Ink Output
Definition of the Seven-Way Valve
-
Working Principle
-
The seven-way valve is composed of seven solenoid valves, each controlling a single channel.
-
By controlling the on/off state of each solenoid valve, the printer switches and routes different flows.
-
For example:
-
When ink needs to be drawn from the cartridge, the seven-way valve opens the ink path and closes other channels.
-
When cleaning is required, it opens the cleaning path and closes other channels.
-
Function in the Printer
-
The seven-way valve manages the ink path, cleaning path, and moisturizing path to ensure normal printer operation.
-
During printing, it transports ink from the ink cartridge to the print head.
-
During cleaning, it transports cleaning liquid to the print head.
-
During moisturizing, it transports moisturizing liquid to keep the print head wet.
Fault Phenomenon
-
An abnormality occurs when switching the seven-way valve before maintenance actions are executed.
-
This leads to partial or complete loss of ink output.
Corresponding fault codes
-
0xFD01190019
-
0xFD0119001A
Cause Analysis
-
The seven-way valve fails to switch partially or completely.
-
The affected channel(s) cannot open properly, which leads to ink output issues (no ink or missing colors/lines).
Troubleshooting Steps
-
Perform a manual deep cleaning.
-
About 3 seconds after starting, the print head will enter the cleaning stage.
-
Listen at the print head position: you should hear six consecutive "dong" (valve switching) sounds.
-
Wait about 90 seconds. The print head will move slightly and then enter the ink suction process.
-
Again, listen at the print head position: you should hear six consecutive "dong" sounds (valve switches) a second time.
If the steps above do not resolve the issue, please contact eufyMake Customer Support at support@eufymake.com and include:
a. Purchase Order Information
b. Printer SN, please refer to: https://support.eufymake.com/s/article/How-to-Check-the-Device-Serial-Number-SN
c. For printer and APP logs, please refer to:https://support.eufymake.com/s/article/Log-Feedback-Upload-Process-App-PC-Overview
d. Provide troubleshooting videos
Cleaning/Moisturizing Valve Abnormal
Fault Phenomenon
Abnormal switching of the cleaning/moisturizing valve prevents cleaning/moisturizing liquid from being pumped to the print head through the metering barrel. As a result, cleaning and moisturizing completely fail.
Corresponding fault codes:
-
0xFD01190024
-
0xFD01190025
Cause Analysis
-
The cleaning/moisturizing valve fails to correctly switch the inlet/outlet direction of the liquid.
-
Because of this, the cleaning/moisturizing liquid cannot be pumped through the metering barrel to the print head, and the cleaning/moisturizing action fails entirely.
Troubleshooting Steps
(Please record a troubleshooting video for backup.)
You can diagnose the problem in two ways:
-
Diagnosis by Sound
-
Perform a manual shutdown (safe shutdown) that triggers the cleaning/moisturizing cycle.
-
Wait for the seven-way valve to complete switching to the cleaning position (about 12 seconds) and enter the cleaning cycle.
-
During the cleaning cycle, you should hear the following sequence:
-
First, a "click" sound
-
About 1 second later, the cleaning gear pump runs for 1.5 seconds
-
Then, a "thud" sound
-
The cleaning cycle will repeat this sequence 11 times.
-
After cleaning, you will hear the seven-way valve switch once more (a single switching operation from cleaning to moisturizing).
-
Wait for the seven-way valve to complete switching to the moisturizing position (about 7 seconds) and enter the moisturizing cycle.
-
During the moisturizing cycle, you should again hear:
-
A "click" sound
-
After 1 second, the moisturizing gear pump runs for 1.5 seconds
-
Followed by a "thud" sound
If these expected sounds are missing or clearly incomplete, the cleaning/moisturizing valve may be abnormal.
-
Diagnosis by Observing the Print Head
-
Perform a deep cleaning.
-
Wait for the seven-way valve to complete switching to the cleaning position (about 12 seconds) and enter the cleaning cycle.
-
Observe whether cleaning liquid is being pumped out from the gap between the print head and the sealing ring, as shown below:
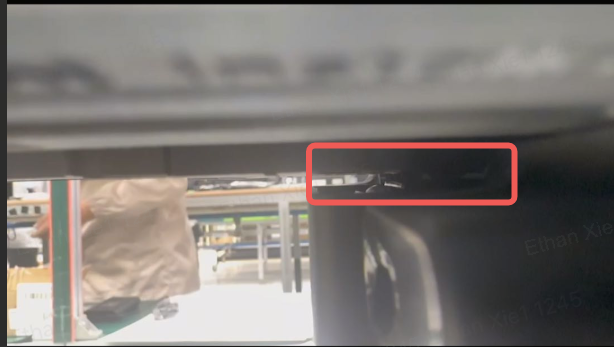
-
If no cleaning liquid appears from this gap, it indicates that the cleaning valve is abnormal.
In this case, please contact eufyMake Customer Support at support@eufymake.com and include:
a. Purchase Order Information
b. Printer SN, please refer to: https://support.eufymake.com/s/article/How-to-Check-the-Device-Serial-Number-SN
c. For printer and APP logs, please refer to: https://support.eufymake.com/s/article/Log-Upload-Process-App-PC-Overview
d. Provide troubleshooting videos


