This article will help you understand how to choose the appropriate printing materials and how to set the appropriate printing parameters for different materials in the software when using eufyMake Texture UV Printer E1 , so as to achieve stable, safe, and high-quality printing results.
-
Supported Material Types
eufyMake Texture UV Printer E1 supports printing on more than 300 materials, including but not limited to:
-
Glass
-
Tile
-
Acrylic
-
Metal
-
Leather
-
Timber
-
Plastic
Different materials (such as plastics, wood, metals, etc.) vary in surface structure, adsorption capacity, and reaction to UV inks , and these differences directly affect the ink's adhesion, curing effect, and final color performance.
Suggestion: Before formal printing, it is recommended to prioritize materials with a flat surface, stable structure, and low deformation tendency for test printing.
-
Materials not suitable for printing
To ensure equipment safety and personal safety, the following types of materials shall not be used as printing substrates :
-
Flammable materials
-
Materials prone to chemical reactions
-
Items that may release harmful gases under UV light or heating conditions
Failure to comply with the above regulations may result in equipment damage, printing failure, or even personal injury.
Safety Notice: If you are unsure whether a certain material is suitable for printing, please first consult the material supplier or conduct a small-scale, low-risk test.
-
Surface treatment before printing
Appropriate surface treatment before printing is an important step to ensure print quality.These preparatory steps can significantly improve the stability and final results of printing.
-
Clean the surface: Remove oil stains, dust, and other impurities from the material surface
-
Use pre-coating liquid (recommended) :
-
For materials with smooth surfaces such as glass, ceramic, metal, and acrylic, it is recommended to wipe the pre-coating liquid in advance
-
Precoating liquid helps improve the adhesion of ink and reduce issues such as ink flaking or uneven color
Select appropriate printing parameters for materials in the software
In eufyMake Studio or eufyMake App, you can directly select the system - preset printing parameters for different materials, thereby simplifying the operation process and achieving more consistent printing results.
-
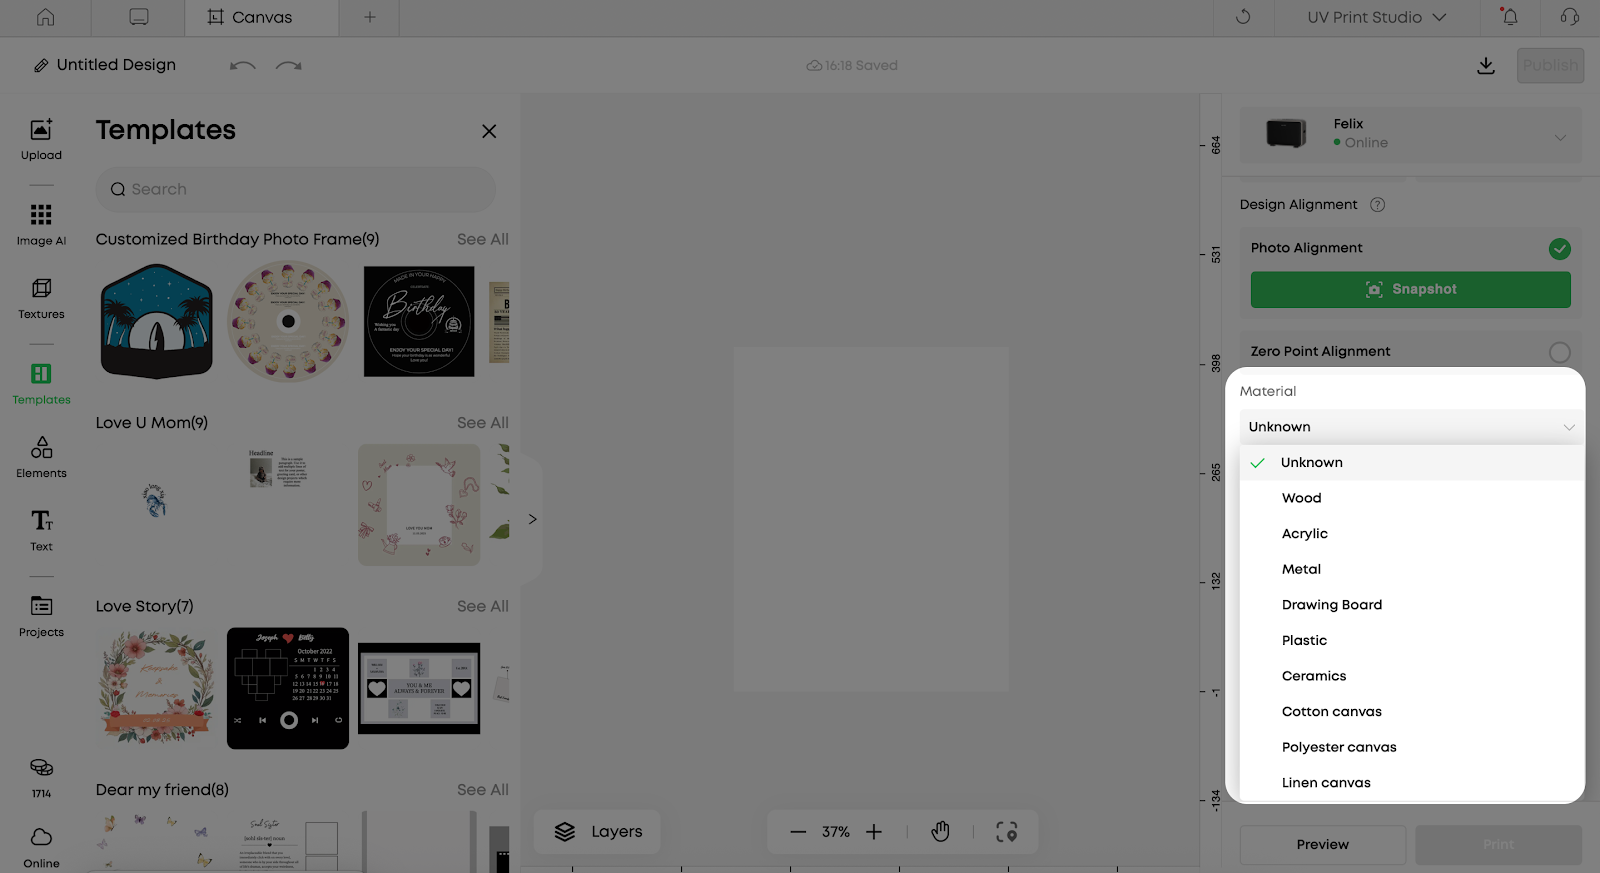
Select material in the editor
In the right parameter panel of the editor interface, you can find the Material selection item . Click the material dropdown menu , and select the material type that matches your current printing substrate .
-
Influence of Material Selection on Printing Parameters
-
After you select a material, the system will automatically adjust a series of default printing parameters to adapt to the characteristics of the material, including:
-
Default White Ink Layers
-
Overlay method of white ink and color ink
-
Basic settings related to color reproduction
-
By automatically adjusting the number of white ink layers, the system can better balance the covering power and color reproduction effect on different substrate surfaces, for example:
-
Provide sufficient background color support on dark or transparent materials
-
Avoid color deviation caused by excessive thickness of white ink on light-colored or highly reflective materials
-
Use default parameters and manual fine-tuning
For most common materials, directly using the default parameters recommended by the system can meet daily printing needs .
If you have the following requirements, you can make manual fine-tuning on this basis:
-
have higher requirements for color accuracy
-
uses non-standard or specially treated materials
-
Perform 2.5D or multi-layer white ink effect printing
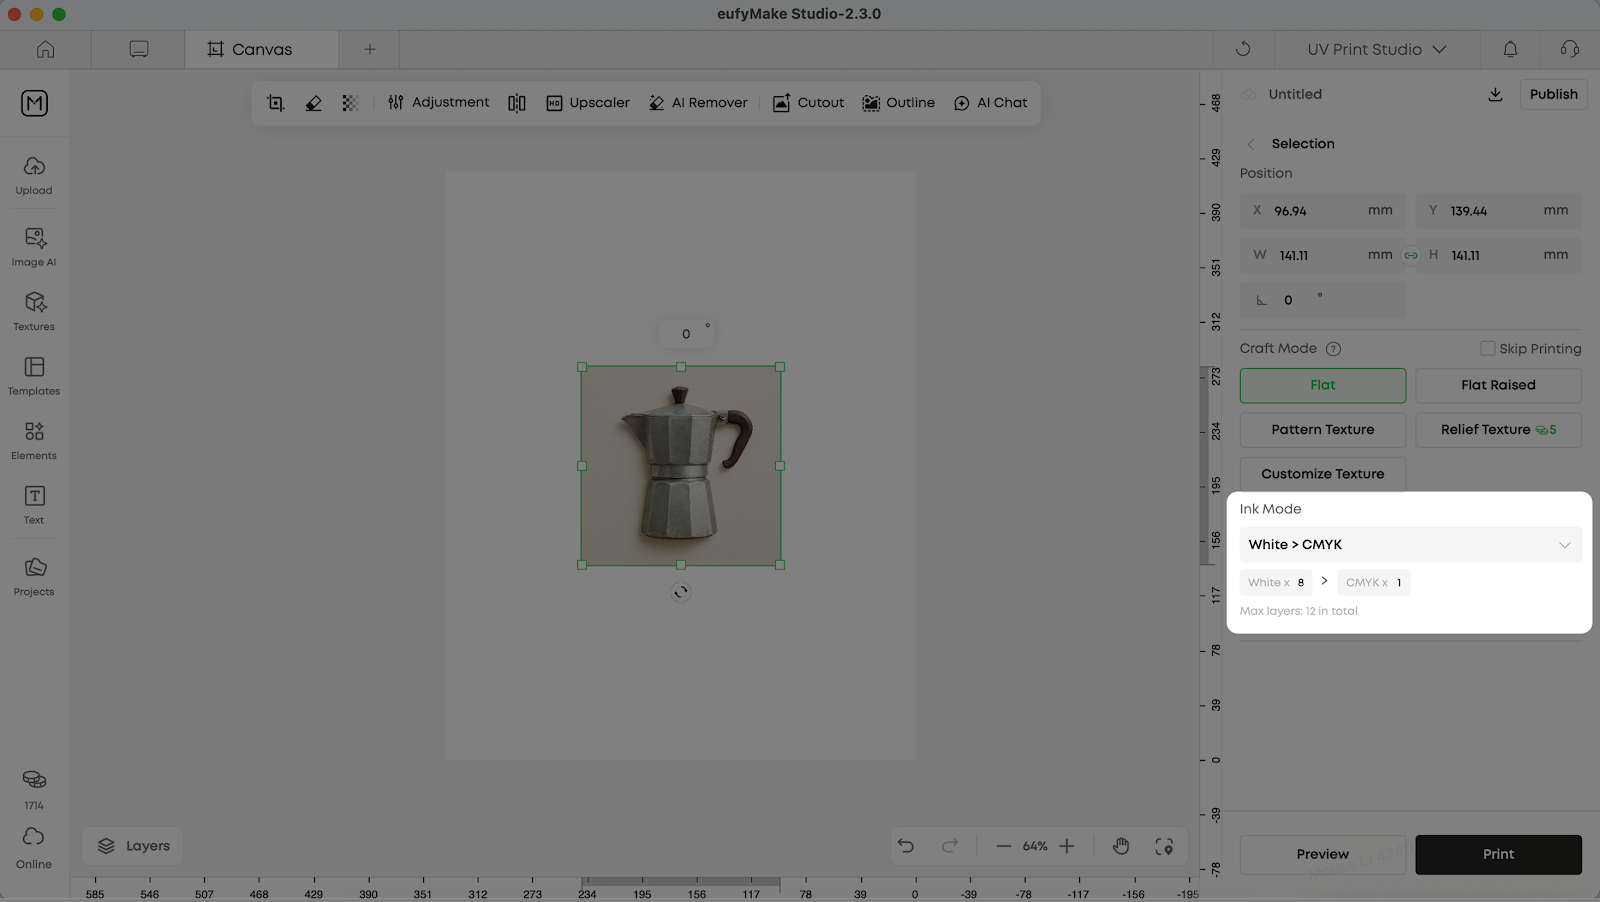
After selecting an image, you can modify the number of white ink layers and CMYK layers
-
Pre-Printing Test Recommendations
Before the official output of the finished product, it is recommended to conduct a small-size test print:
-
Verify the ink adhesion situation
-
Check if the color meets the expectations
-
Confirm white ink coverage and layering effects
Frequently Asked Questions (FAQ)
Q1: If I cannot find an option that exactly matches the actual material, how should I choose?
If there is no option in the software that exactly matches your material, it is recommended that:
-
Prioritize materials with the closest material properties (e.g., similar transparency and surface smoothness)
-
Conducted using system default parameters Small size test print
-
Based on the test results, fine-tune the key parameters (such as the number of white ink layers) accordingly
Q2: Why does the color of the same image look different on different materials?
This is a normal phenomenon. Different materials vary in the following aspects:
-
Surface Color and Reflectance
-
Coverage requirements for white ink
-
Effect of ink adhesion and curing
The software will try to ensure color consistency by adjusting the default number of white ink layers, but the physical properties of the substrate itself will still affect the final visual effect . Therefore, test printing is always an important step to achieve the desired results.
Q3: Do all materials have to use pre-coating liquid?
Not all materials require the use of pre-coating liquid, but in the following cases it is strongly recommended :
-
The surface is very smooth (such as glass, ceramic, metal, acrylic)
-
has experienced issues such as ink flaking and insufficient adhesion
-
has high requirements for the durability and stability of the finished product
For materials with rough surfaces or strong adsorption properties (such as some types of wood), whether to use them can be determined based on actual test results.
Q4: Can I manually modify the number of white ink layers after selecting the material?
Yes. Material selection is mainly used to setthe recommended default parameters, and you can still manually adjust the number of white ink layers according to actual needs.
The recommended approach is:
-
First, use the system default settings for testing
-
When the confirmed effect is not ideal, then proceed with gradual fine-tuning
-
After each adjustment, perform comparative printing to avoid making overly large changes all at once
Q5: What impact will the use of inappropriate materials have on the equipment?
Using non-compliant materials (such as flammable or chemically reactive items) may lead to:
-
Ink fails to adhere or cure properly
-
Abnormal odor or smoke appears during the printing process
-
Equipment components are damaged, and there are even safety risks
To ensure the safety of equipment and personnel, please always follow the material usage specifications and avoid attempting unvalidated high-risk materials.
Summary
Selecting appropriate materials and correctly setting the corresponding printing parameters in the software are the keys to achieving high-quality UV printing results.
-
Before printing, confirm that the material is safe, suitable, and has undergone proper surface treatment
-
Correctly select materials in the software to allow the system to automatically match and recommend parameters
-
Gradually find the settings that best suit your application scenario through test printing and necessary fine-tuning
If you encounter any issues during the material selection or parameter setting process, you are welcome to refer to more official documentation or contact technical support for assistance.


