Customize Your Height Map in Craft Mode
1. What Is Height Map Editing?
2. Where Can You Access Height Map Editing?
3. What Can You Do in Height Map Editing?
4. Global Height Map Adjustments
7. Recommended Editing Workflow
8. Global Preview and Advanced Edit
9. Undo, Redo, Reset, and Auto-Save
10. What Happens When You Return to the Canvas?
11. When Should You Use This Feature?
Customize Your Height Map in Craft Mode
In Craft Mode, you can edit the Height Map directly in the editor to control the raised details of your 2.5D UV print.
A Height Map is a grayscale image that determines the buildup height of different areas:
-
Brighter areas produce greater buildup and print higher.
-
Darker areas produce less buildup and print lower.
-
Pure black areas have no buildup.
Custom Height Map Editing provides two ways to adjust the result:
-
Global adjustments: Modify the overall height distribution of the entire Height Map.
-
Brush adjustments: Fine-tune specific areas using local editing tools.
This guide explains what Height Map Editing does, where to access it, and how to use both editing methods effectively.
1. What Is Height Map Editing?
Height Map Editing allows you to directly modify the grayscale image that controls the buildup height of your print.
You can use it to:
-
Make the entire design more raised or more subtle
-
Increase or reduce height variation across the image
-
Emphasize specific raised areas
-
Reduce unwanted buildup in selected regions
-
Refine local textures and depth without leaving the editor
Instead of exporting the Height Map to external image-editing software and importing it again, you can complete the entire editing process within Craft Mode.
2. Where Can You Access Height Map Editing?
There are two ways to open Height Map Editing, depending on your workflow.
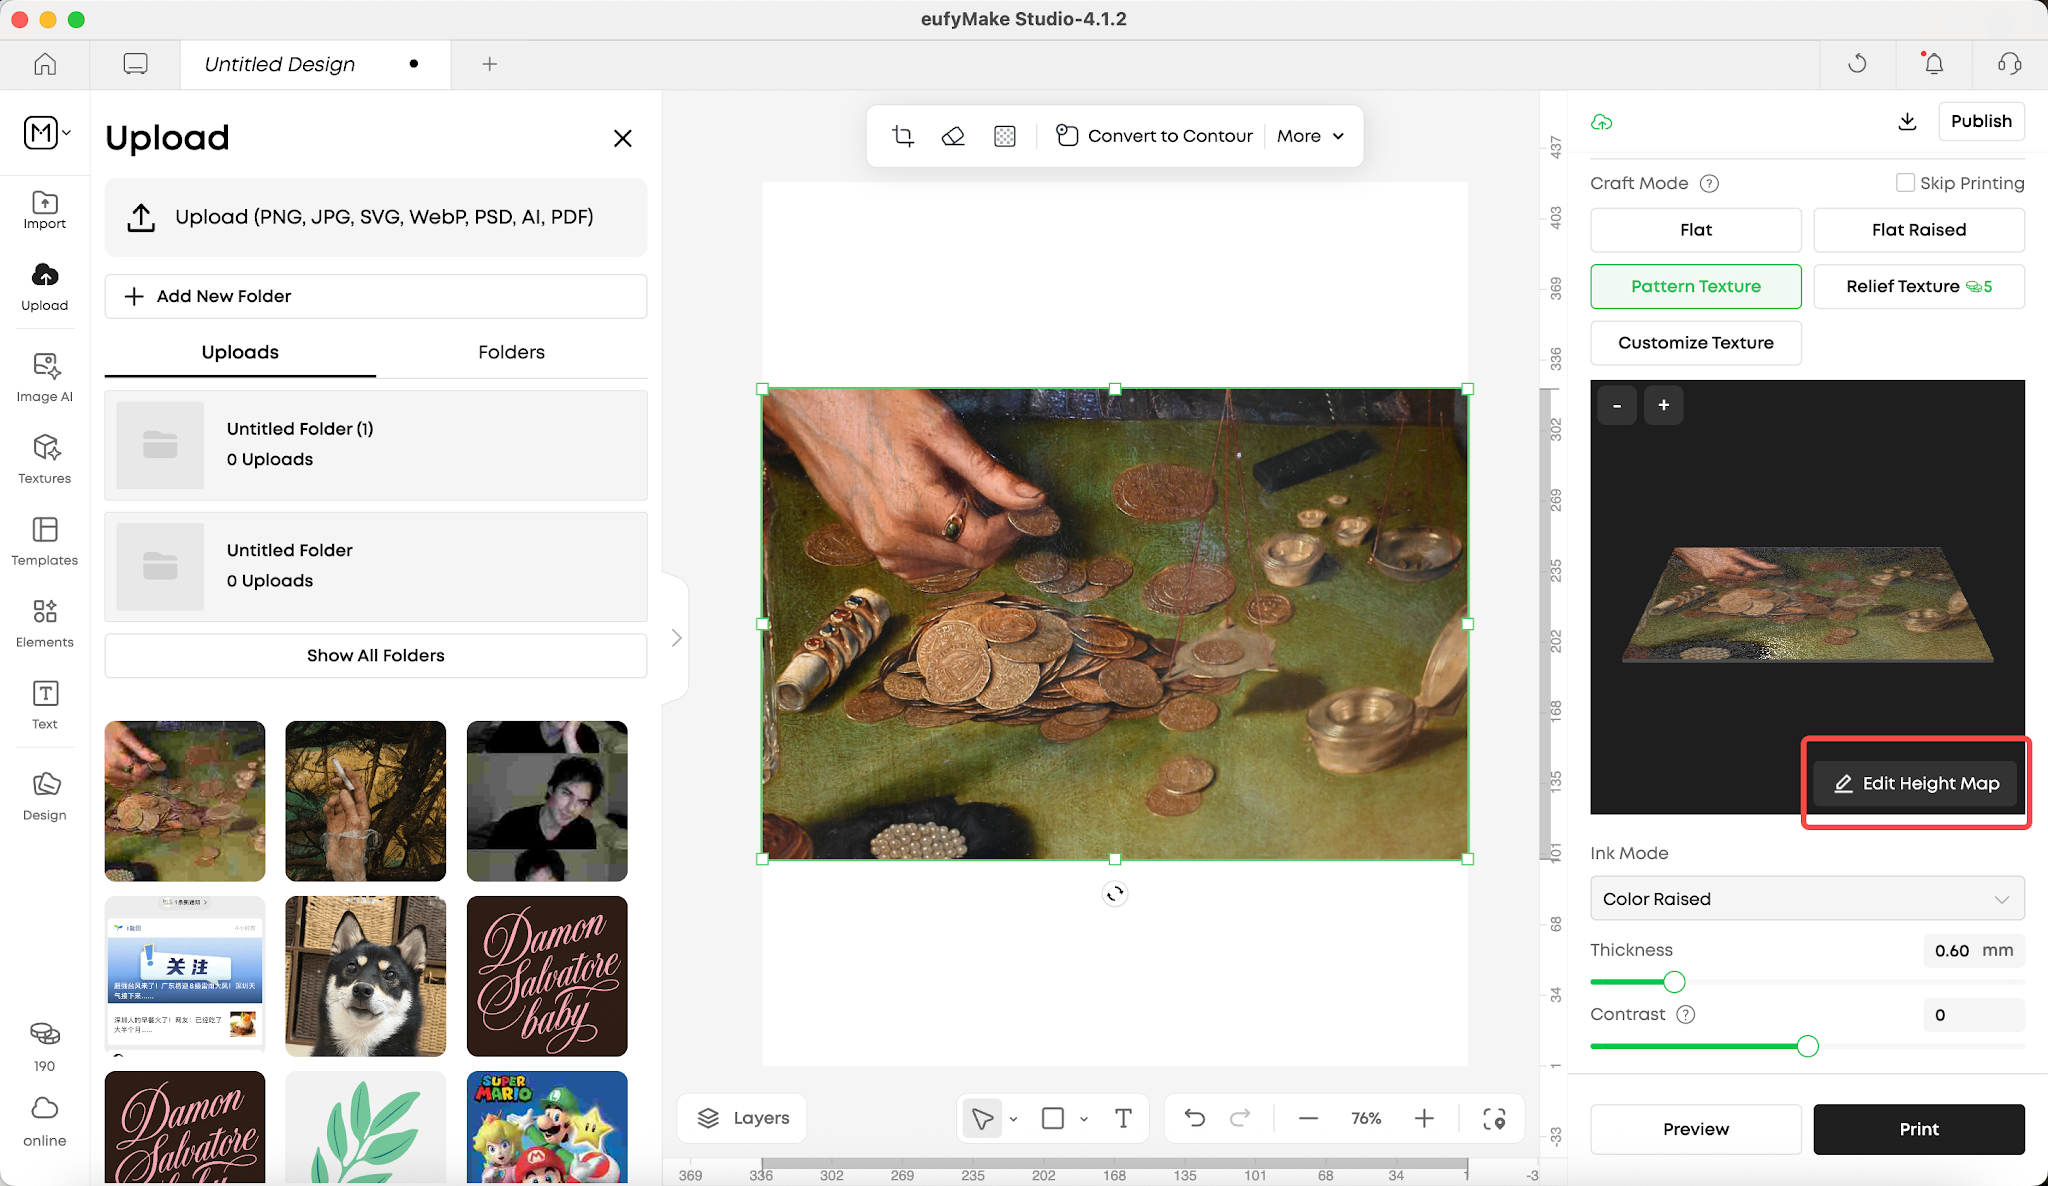
Method 1: From a Selected Image on the Canvas
Use this method when you already know which object you want to edit.
-
Select an image on the canvas.
-
In the Craft Mode preview area on the right, click Edit Height Map.
-
The full-screen Height Map editing page opens for the selected image.
This method is useful when you want to edit a specific image without first reviewing all layers.
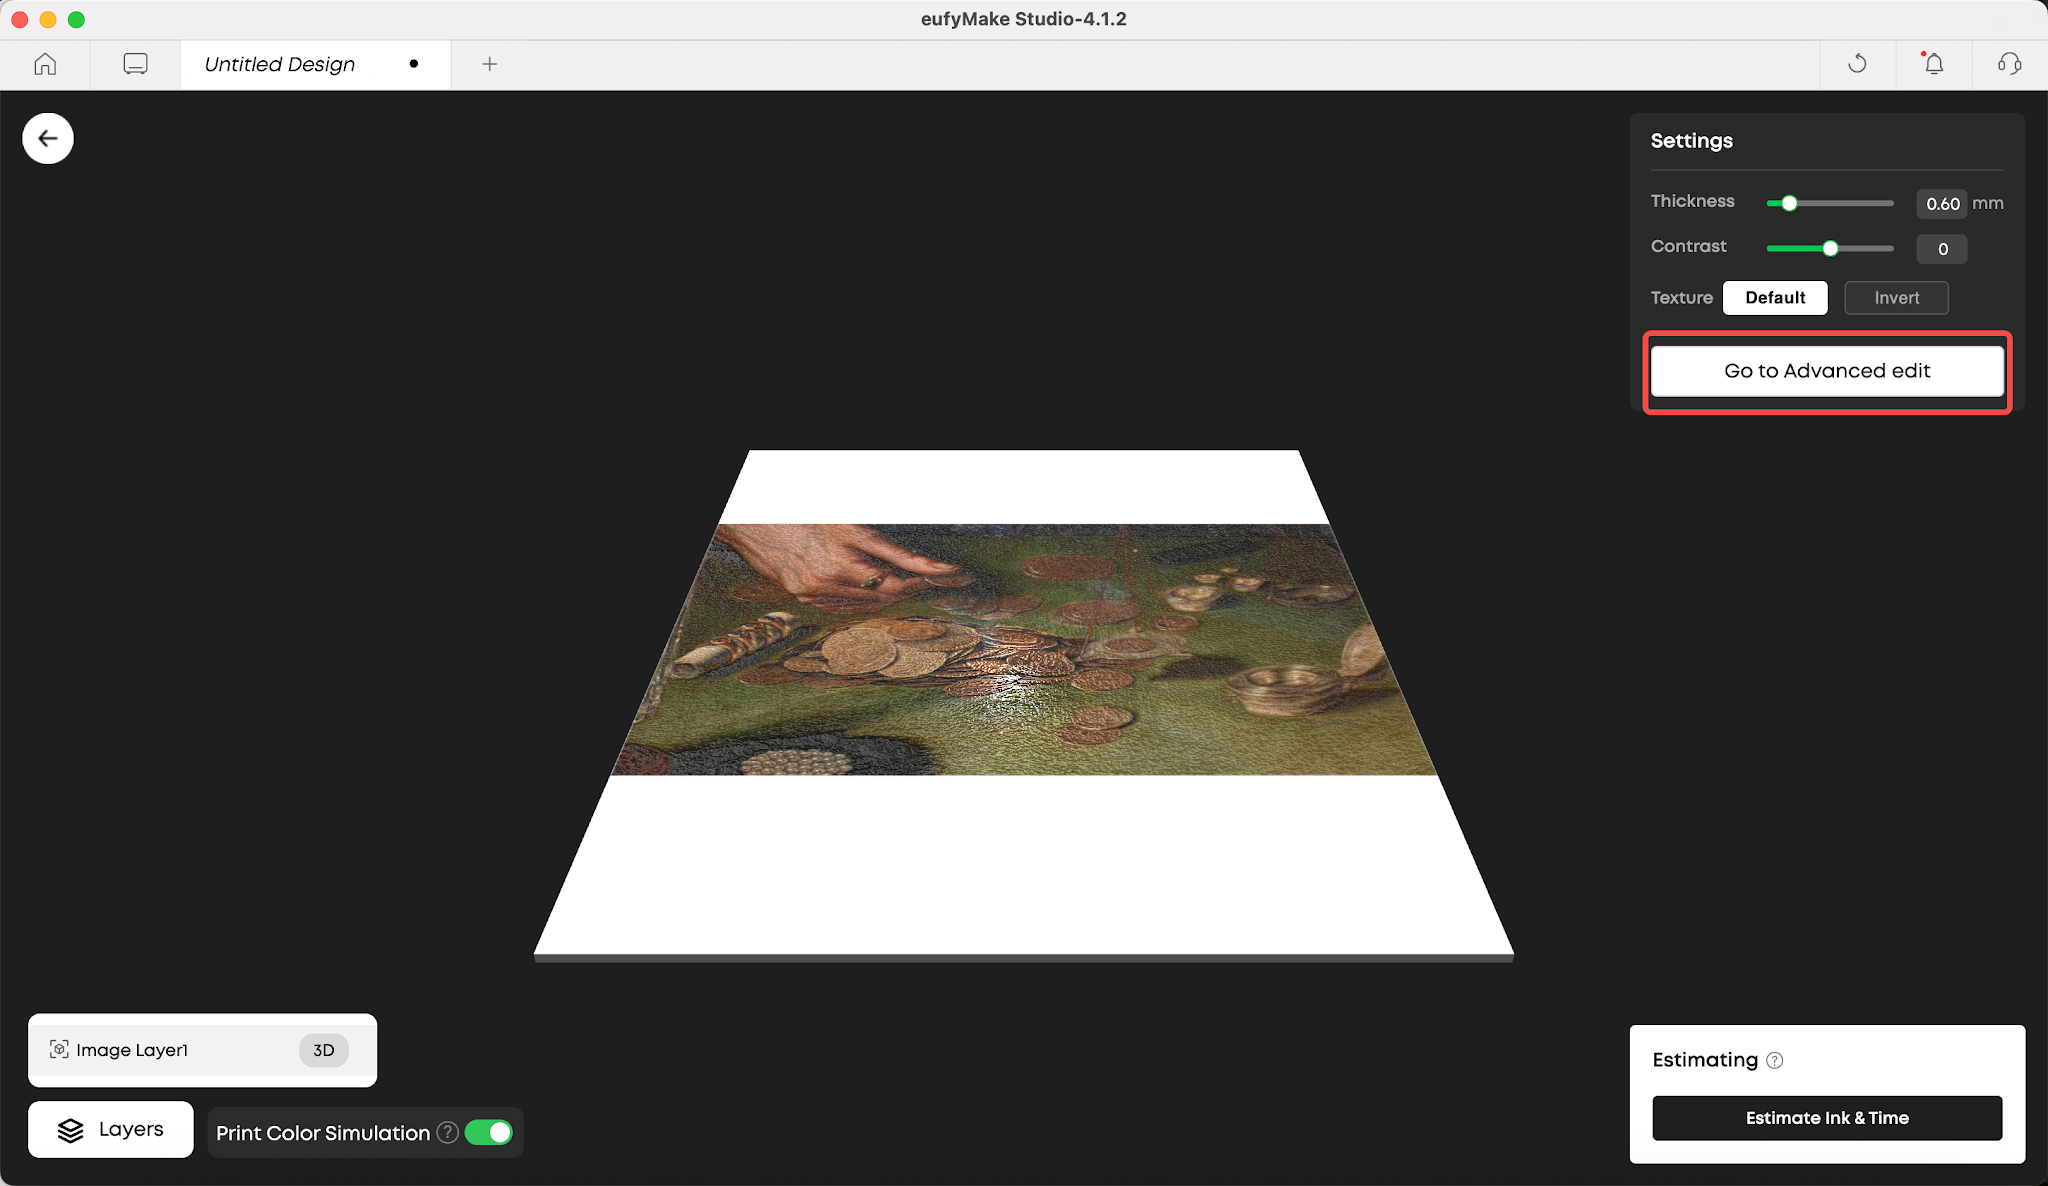
Method 2: From Global Preview
Use this method when you want to review the complete 3D result before selecting a layer to edit.
-
Click Preview at the bottom of the right-side panel.
-
The full-screen Global Preview page opens.
-
Select the target layer from the layer list.
-
Click Go to Advanced Edit.
-
The advanced Height Map editing view opens for the selected layer.
This method is useful when your design contains multiple layers and you want to inspect the overall result before editing a specific layer.
3. What Can You Do in Height Map Editing?
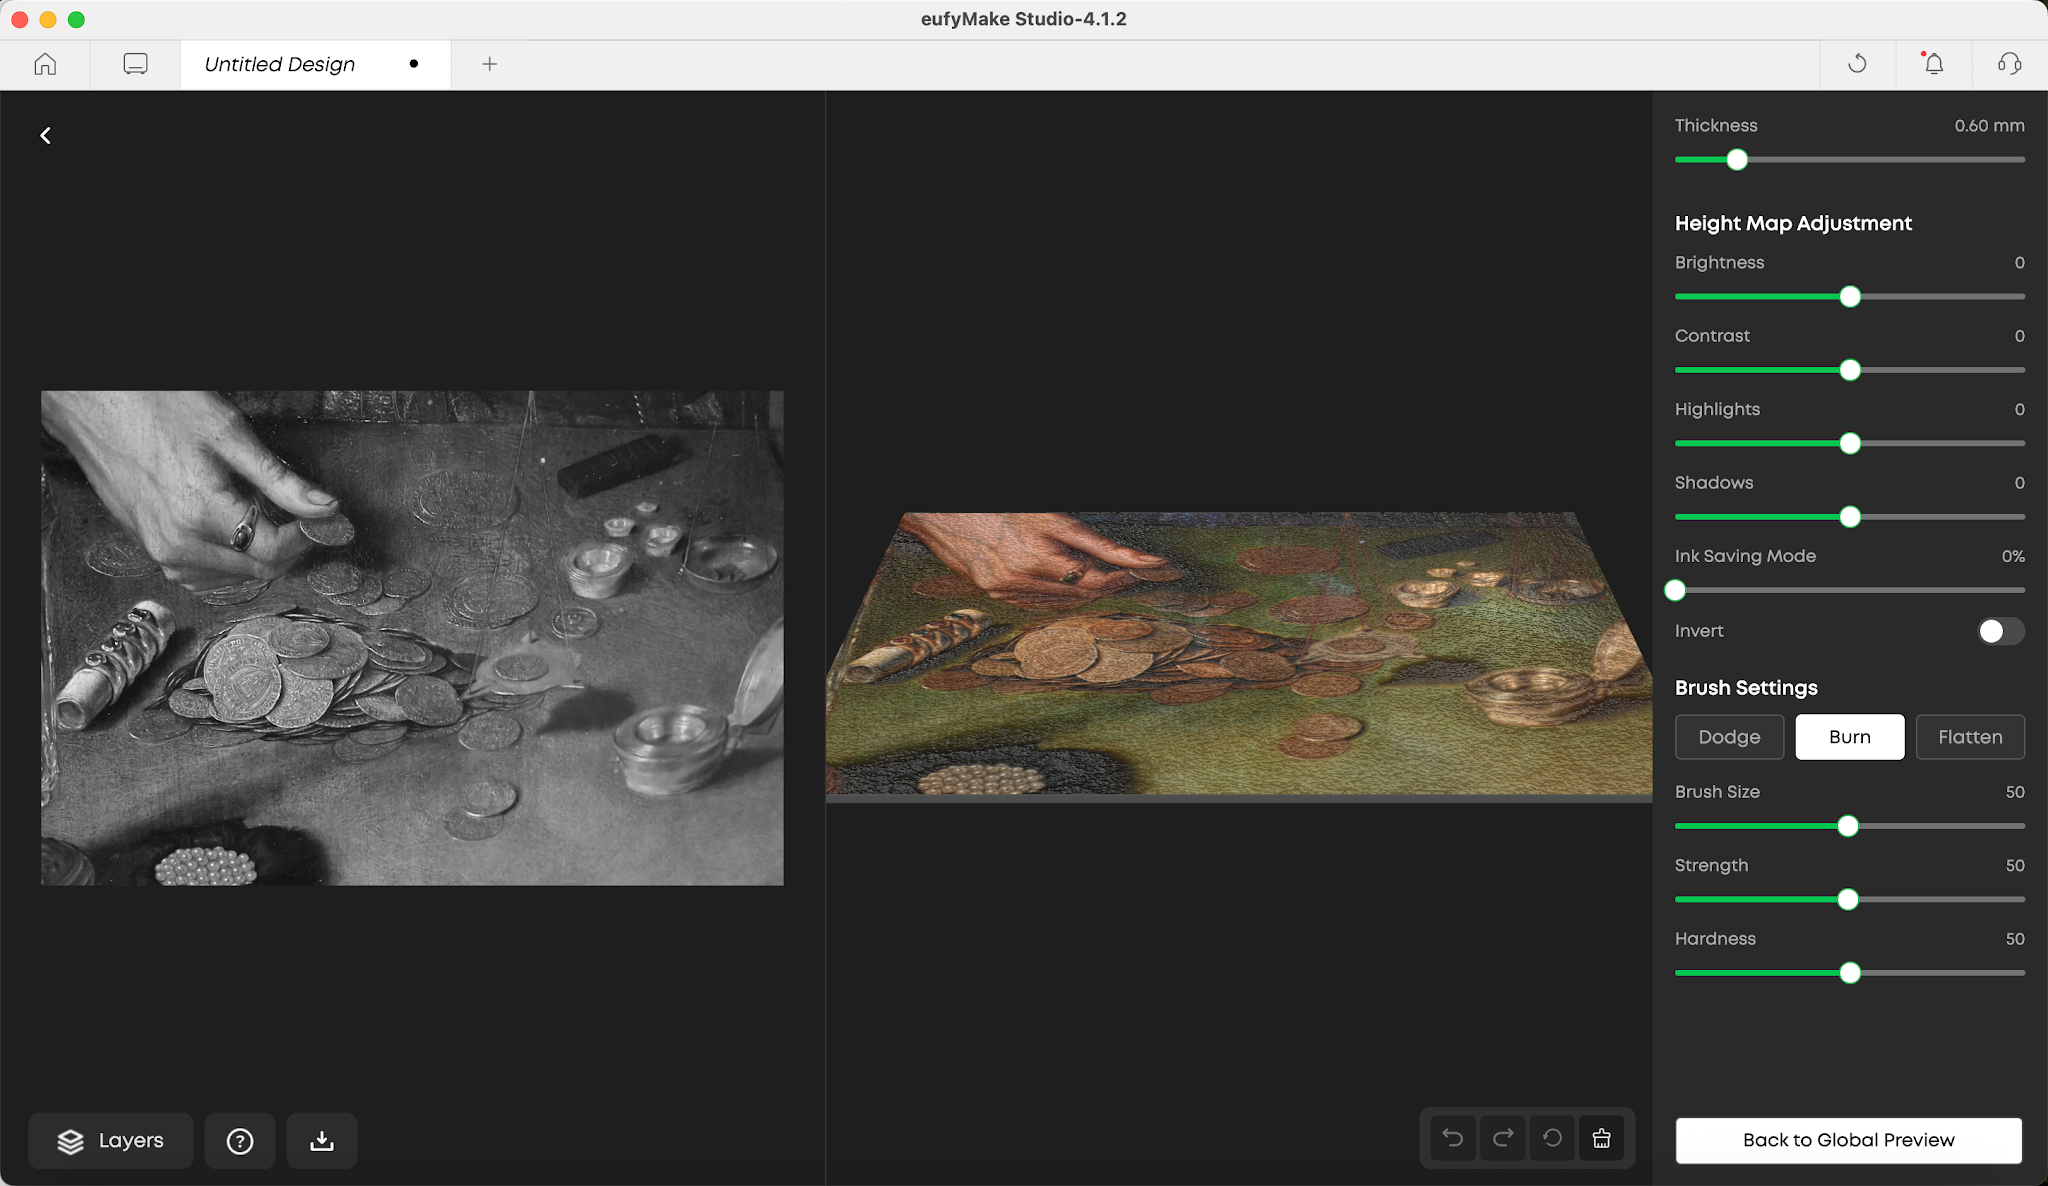
Height Map Editing includes two types of controls:
-
Global adjustments that affect the entire image
-
Brush tools for editing specific areas
The preview updates in real time, allowing you to see how each adjustment affects the expected raised print result.
4. Global Height Map Adjustments
Global adjustments affect the entire Height Map.
Use them when the overall relief appears too flat, too strong, too shallow, or unevenly distributed.
The available controls are:
-
Brightness
-
Contrast
-
Highlights
-
Shadows
-
Gamma
Brightness
Brightness adjusts the overall brightness of the Height Map.
-
Increasing Brightness makes more areas brighter, increasing the overall buildup height.
-
Decreasing Brightness darkens the image, reducing the overall buildup height.
Use this control when the entire design appears generally too high or too low.
Contrast
Contrast adjusts the difference between lighter and darker areas.
-
Increasing Contrast increases the difference between high and low areas, creating stronger height variation.
-
Decreasing Contrast reduces the difference between high and low areas, creating a smoother and flatter result.
Use this control when you want either a stronger relief effect or more gradual surface transitions.
Highlights
Highlights adjusts the brighter areas of the Height Map.
-
Increasing Highlights makes already bright areas brighter, increasing their buildup height.
-
Decreasing Highlights reduces the height of these raised areas.
Use this control when you want to emphasize or soften the highest parts of the design.
Shadows
Shadows adjusts the darker areas of the Height Map.
-
Increasing Shadows brightens darker areas, raising lower regions and reducing the difference between low and high areas.
-
Decreasing Shadows darkens these regions, reducing their buildup height further.
Use this control when you want to raise or deepen the lower areas of the design.
Gamma
Gamma
Gamma adjusts the distribution of midtones in the Height Map.
-
Increasing Gamma expands the range of medium-height areas, allowing more of the subject to contribute to the raised effect.
-
Decreasing Gamma narrows the raised region and concentrates the height effect within a smaller area.
Use this control when the main raised shape appears too broad or too narrow.
5. Brush Tools
Brush tools allow you to edit specific areas of the Height Map.
They are useful when only part of the design needs adjustment, such as when you want to:
-
Reduce buildup in one area
-
Make a logo or design element stand out
-
Create clearer separation between the subject and background
-
Refine textures in selected regions
The available brush tools are:
-
Dodge
-
Burn
-
Flatten
Dodge
The Dodge tool brightens the painted area.
Because brighter areas print higher, Dodge increases the local buildup height and makes the selected area more raised.
Use Dodge when you want to increase the height of a specific area.
Burn
The Burn tool darkens the painted area.
Because darker areas print lower, Burn reduces the local buildup height.
Use Burn when you want to reduce the height of a specific area or deepen a lower region.
Flatten
The Flatten tool removes the existing height variation from the painted area.
Areas edited with Flatten are changed to no buildup.
Use this tool when you want to remove unwanted raised details or completely flatten selected regions.
6. Brush Settings
When using Dodge, Burn, or Flatten, you can adjust the behavior of the brush using the following settings.
Brush Size
Brush Size controls the area affected by each brush stroke.
-
A larger brush affects a wider area.
-
A smaller brush provides greater control for detailed editing.
Use a smaller brush for edges, text, and fine details. Use a larger brush for broad surfaces.
Strength
Strength controls the intensity of each brush stroke.
-
A higher Strength applies a stronger change with each stroke.
-
A lower Strength applies a more gradual change and provides finer control.
Use a lower Strength when you want to build up the effect gradually.
Hardness
Hardness controls how sharp or soft the edge of the brush is.
-
A higher Hardness creates a sharper edge with less transition.
-
A lower Hardness creates a softer, feathered edge with a smoother transition.
Use a lower Hardness when you want the edited area to blend naturally into the surrounding surface.
7. Recommended Editing Workflow
If you are unsure where to begin, use the following workflow:
-
Open the target image or layer in Height Map Editing.
-
Begin with global adjustments to establish the overall height distribution.
-
Review the preview and identify any areas that still require refinement.
-
Use Dodge to raise specific areas.
-
Use Burn to lower specific areas.
-
Use Flatten to remove unwanted buildup or completely flatten selected regions.
-
Preview the result and continue refining it as needed.
-
Click Back to return to the canvas.
Starting with global adjustments is generally faster and provides more consistent results than attempting to complete the entire edit using brush tools alone.
8. Global Preview and Advanced Edit
When you enter through Preview, the full-screen page initially opens in Global Preview.
In Global Preview, you can:
-
Review the complete 3D result
-
View all layers together
-
Select the layer you want to edit
After selecting a layer, click Go to Advanced Edit to begin detailed Height Map editing.
This workflow allows you to move from reviewing the overall design to precisely editing an individual layer.
9. Undo, Redo, Reset, and Auto-Save
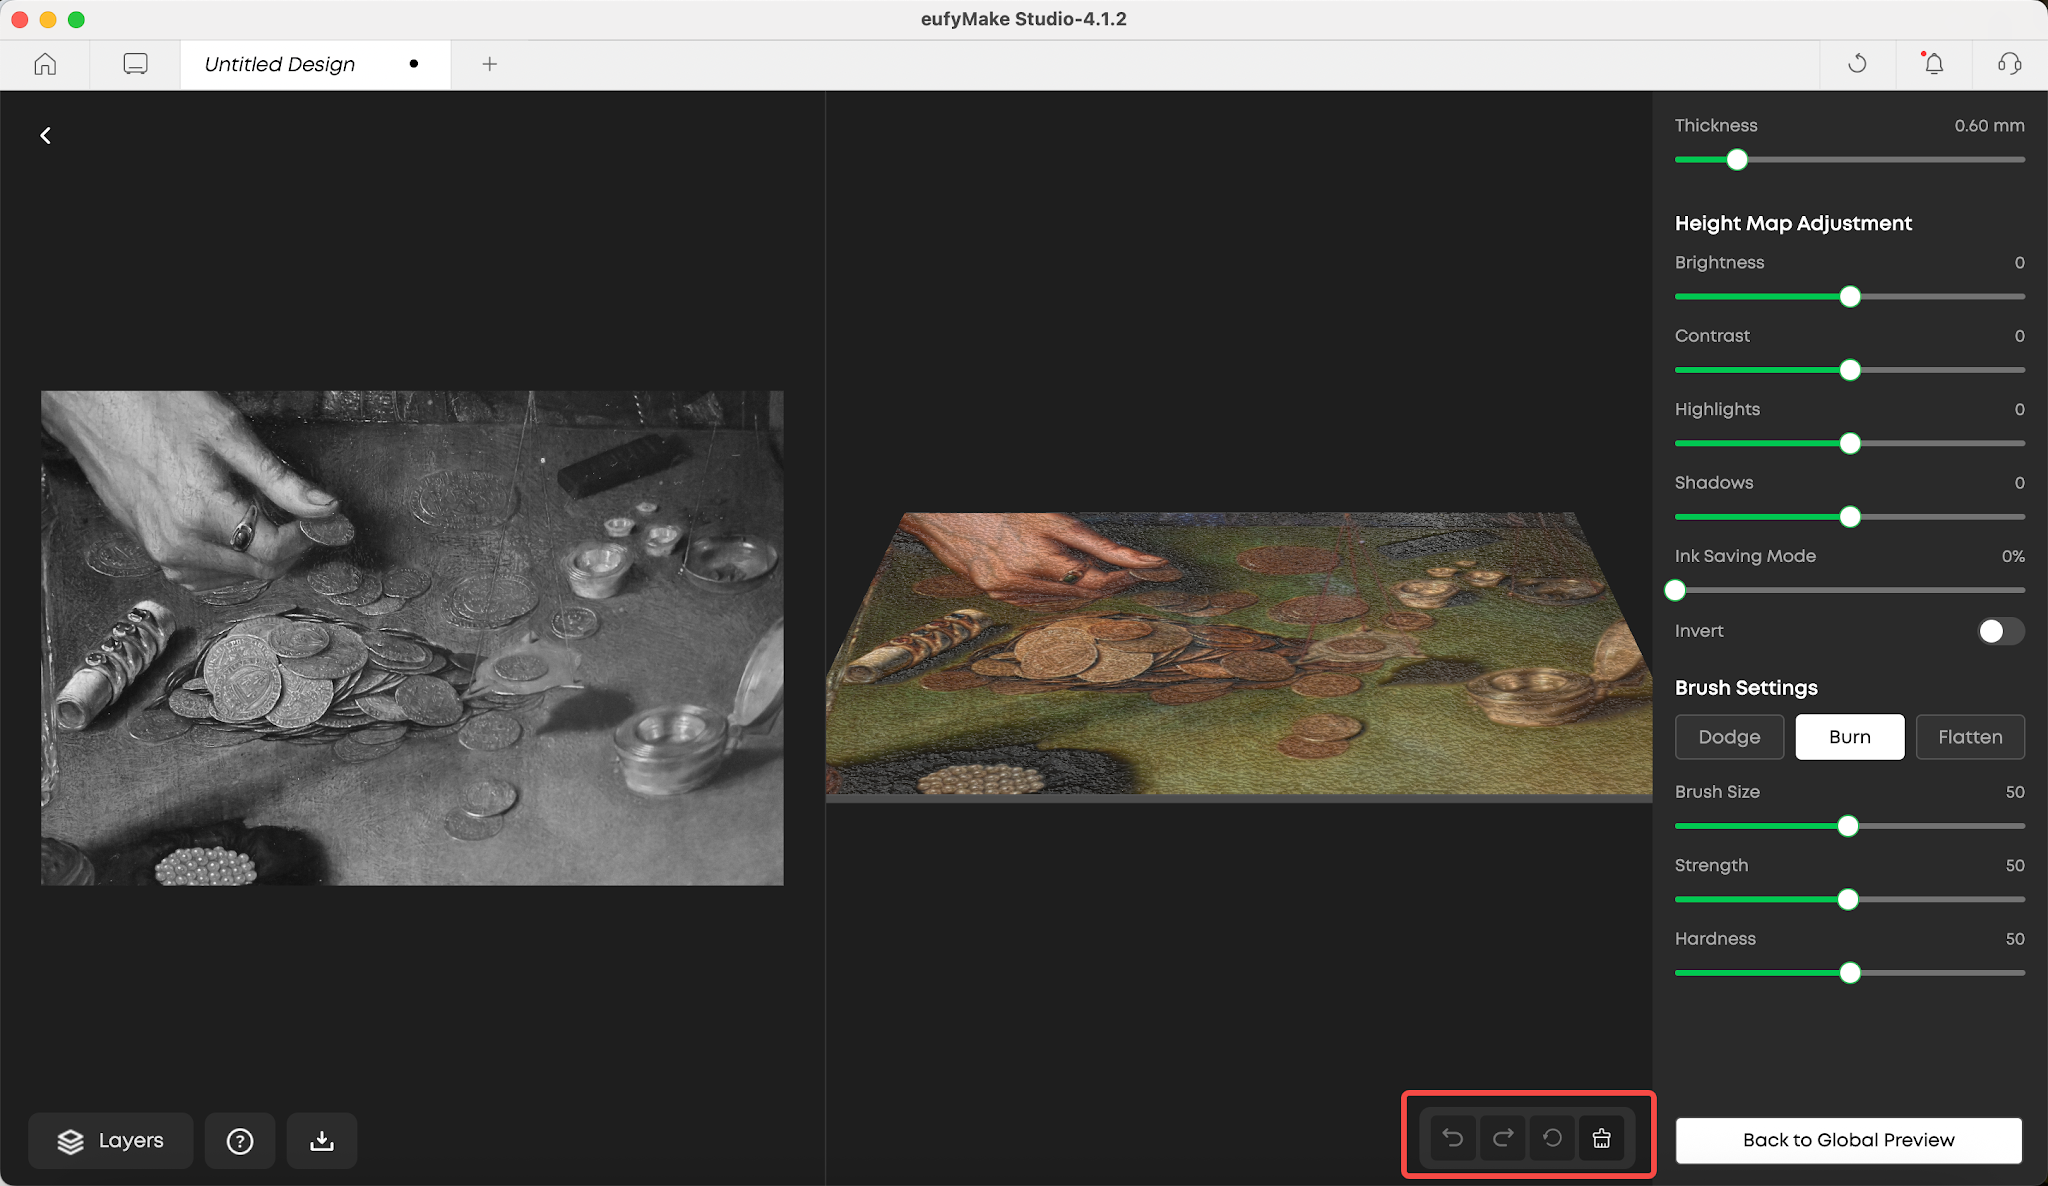
Height Map Editing includes standard editing controls to help you manage your adjustments.
Undo and Redo
You can undo or redo recent actions while working on the full-screen editing page.
Supported actions include:
-
Slider adjustments
-
Brush strokes
-
Local Height Map edits
Reset
Click Reset to restore the Height Map to its original state for the current editing session.
Use Reset when you want to discard all current adjustments and begin again.
Auto-Save
Changes are saved automatically. There is no manual Save button.
Auto-save is triggered shortly after actions such as:
-
Releasing a slider
-
Completing a brush stroke
-
Using Undo or Redo
This allows you to continue editing without interrupting your workflow.
When you click Back and return to the canvas, your changes have already been saved.
10. What Happens When You Return to the Canvas?
When you finish editing and click Back, all changes made on the full-screen editing page are preserved.
Although you may have made several individual adjustments, they are grouped into a single completed editing action when you return to the main canvas.
This keeps the editing history on the main canvas simpler and easier to manage.
11. When Should You Use This Feature?
Custom Height Map Editing is particularly useful when you want to:
-
Create more layered 2.5D relief effects
-
Position text, subjects, and backgrounds at different height levels
-
Reduce unwanted raised areas before printing
-
Refine surface textures for a more polished print result
-
Complete Height Map editing directly within Craft Mode without using external software
12. Summary
Height Map Editing gives you direct control over how buildup height is distributed across your UV print.
With this feature, you can:
-
Adjust the complete Height Map using global controls
-
Refine specific areas using Dodge, Burn, and Flatten
-
Preview changes in real time
-
Complete the entire workflow within Craft Mode
-
Save changes automatically without interrupting your work